Back in May 2020, Microsoft announced a new feature for Azure Blob Storage called Blob Index. Essentially, this enables you to add key/value tags to your Blob objects and be able to query said Blob objects without having to use a separate service like Azure Search.
This is great because in many instances you'd only want to store a few additional properties for your Blob objects and still be able to query on theses properties without having to create and maintain a separate database that does this for you (or setup something like Azure Search)
Now, bear in mind this is still in Preview and the features can still change and there are also a few limitations to consider (source):
- Each blob can have up to 10 blob index tags
- Tag keys must be between one and 128 characters
- Tag values must be between zero and 256 characters
- Tag keys and values are case-sensitive
- Tag keys and values only support string data types. Any numbers, dates, times, or special characters are saved as strings
- Tag keys and values must adhere to the following naming rules:
- Alphanumeric characters:
- a through z (lowercase letters)
- A through Z (uppercase letters)
- 0 through 9 (numbers)
- Valid special characters: space, plus, minus, period, colon, equals, underscore, forward slash (
+-.:=_/)
- Alphanumeric characters:
With that said, I was excited to try this out, so in this post I'll show you how you can search your Azure Blob Storage files using Blob Index and C#.
The Console App
We'll create a simple .NET Core Console Application to upload a few files to Azure Blob Storage, with some tags and then search them. I'm not going to take you through the process of creating the Console Application, but if you get stuck on this, let me know in the comments.
After you've created the Console Application, add the [Azure.Storage.Blobs NuGet package] (nuget.org/packages/Azure.Storage.Blobs) and create a new class called StorageService. This class will have the following two methods:
- UploadFile, which is a simple class to upload a file and associate some tags with it.
- FindCustomerFiles, will return a list of Blob objects associated with a customer or a tag called Customer.
Uploading Azure Blob objects
The code for the UploadFile method follows:
public async Task UploadFile(string containerName, string filePath, Dictionary<string, string> tags)
{
    string fileName = Path.GetFileName(filePath);
    BlobContainerClient container = _client.GetBlobContainerClient(containerName);
    BlobClient blob = container.GetBlobClient(fileName);

    using FileStream fileStream = File.OpenRead(filePath);
    await blob.UploadAsync(fileStream, false);
    fileStream.Close();
    await blob.SetTagsAsync(tags);
}
You'll notice the method does not do anything spectacularly different than usually when uploading files to Azure Blob storage, however, take a look at the .SetTagsAsync method on the BlobClient object. This method take a Dictionary object containing all the tags we want to associate with the Blob object.
To upload files, we'll call the UploadFile method as illustrated below:
static async Task UploadFile(string filePath)
{
    string accountName = "<your-account-name>";
    string accountKey = "<your-account-key>";

    var storageService = new StorageService(accountName, accountKey);

    Dictionary<string, string> tags1 = new Dictionary<string, string>
    {
        {"customer", "Acme Inc."},
        {"product", "Anvil"}
    };
    await storageService.UploadFile("files", filePath, tags1);
}
The code above creates a new instance of the StorageService class and passes in the Azure Blob Storage account name and key as constructor parameters. Next, we create a new Dictionary object containing two tags called customer and product. Lastly, we upload the file to a Blob container called files. (The full code listing for the StorageService class is available at the bottom of this post.)
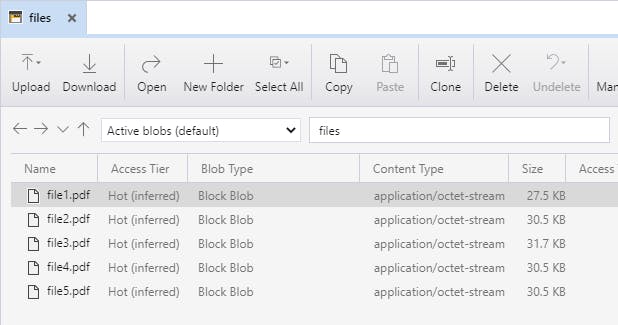
After uploading a few files using the UploadFile method, we should see them inside our files Blob Container, e.g.:

We're using the Microsoft Azure Storage Explorer to view these files. If you do not already have it installed, get it here.
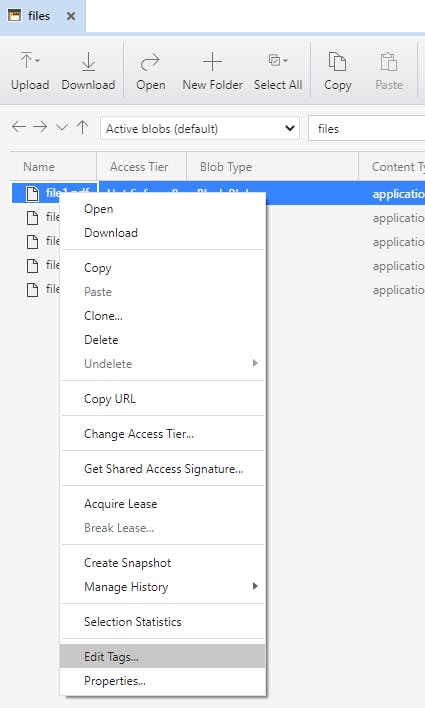
To test whether our code worked, right-click on a file and select Edit Tags...

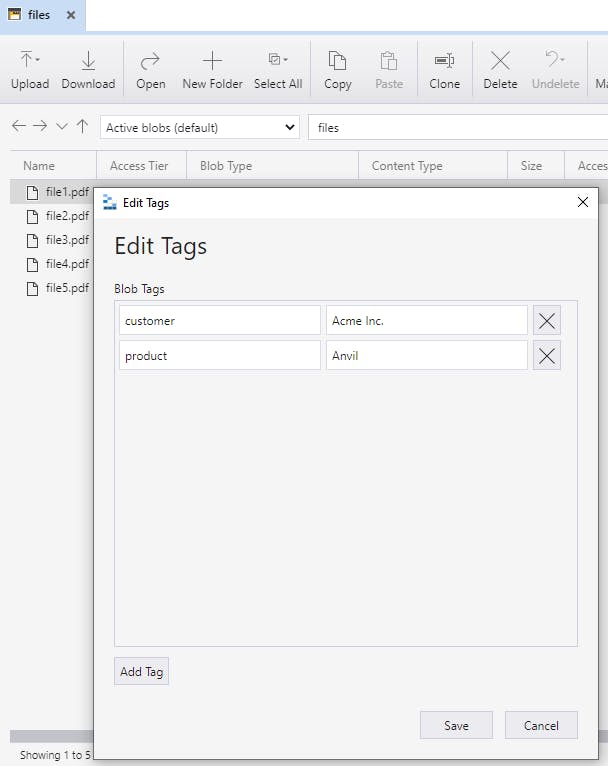
You should see a list of tags associated with the Blob object:

Searching for Azure Blob objects
The FindCustomerFiles method will perform a relatively simple search that will return any Blob objects in a specified container with a "customer" tag containing the supplied customer name. The code for the method follows:
public async Task<List<TaggedBlobItem>> FindCustomerFiles(string customerName, string containerName = "")
{
    var foundItems = new List<TaggedBlobItem>();
    string searchExpression = $"\"customer\"='{customerName}'";
    if (!string.IsNullOrEmpty(containerName))
        searchExpression = $"@container = '{containerName}' AND \"customer\" = '{customerName}'";

    await foreach (var page in _client.FindBlobsByTagsAsync(searchExpression).AsPages())
    {
        foundItems.AddRange(page.Values);
    }
    return foundItems;
}
The most important part of the FindCustomerFiles method is the FindBlobsByTagsAsync method on the BlobServiceClient object. It takes an ANSI SQL WHERE clause parameter and supports the following operators =, >, >=, <, <=, AND. Note that it will return ALL Blobs in the storage account that match the search expression, if you want to limit the results to a particular Blob container add @container to the search expression.
To use the FindCustomerFiles method to find all Blobs associated with customer Acme Inc. in the files Blob container, you'll use the following code:
static async Task FindFiles()
{
    string accountName = "<your-account-name>";
    string accountKey = "<your-account-key>";

    var storageService = new StorageService(accountName, accountKey);
    var files = await storageService.FindCustomerFiles(customerName: "Acme Inc.", containerName: "files");
    foreach (var file in files)
    {
        Console.WriteLine(file.BlobName);
    }
}
StorageService code listing
The full code for the StorageService class follows:
public class StorageService
{
    private readonly BlobServiceClient _client;

    public StorageService(string accountName, string accountKey)
    {
        var connectionString = $"DefaultEndpointsProtocol=https;AccountName={accountName};AccountKey={accountKey};EndpointSuffix=core.windows.net";
        _client = new BlobServiceClient(connectionString);
    }

    public async Task UploadFile(string containerName, string filePath, Dictionary<string, string> tags)
    {
        string fileName = Path.GetFileName(filePath);
        BlobContainerClient container = _client.GetBlobContainerClient(containerName);
        BlobClient blob = container.GetBlobClient(fileName);

        using FileStream fileStream = File.OpenRead(filePath);
        await blob.UploadAsync(fileStream, false);
        fileStream.Close();
        await blob.SetTagsAsync(tags);
    }

    public async Task<List<TaggedBlobItem>> FindCustomerFiles(string customerName, string containerName = "")
    {
        var foundItems = new List<TaggedBlobItem>();
        string searchExpression = $"\"customer\"='{customerName}'";
        if (!string.IsNullOrEmpty(containerName))
            searchExpression = $"@container = '{containerName}' AND \"customer\" = '{customerName}'";

        await foreach (var page in _client.FindBlobsByTagsAsync(searchExpression).AsPages())
        {
            foundItems.AddRange(page.Values);
        }
        return foundItems;
    }
}
I hope you can see the same potential for this as I can and how easy it is to add a simple and quick file search to your Azure Blob Storage solutions.
Thank you for reading! Until next time, keep coding!

