Creating a South African ID Number custom validation attribute for ASP.Net MVC

Pieter van der Westhuizen, a professional freelance web & mobile developer and founder of Coalition Software.
ASP.Net MVC gives you the option to create your own custom validation attributes in order to validate your models. I’ve recently needed such a validation attribute in order to check whether a valid South African ID Number was entered in a web form.
I’ve stumbled upon a nice C# implementation of this article by Donovan Olivier, in order to validate a South African ID Number and return information such as gender and whether the person is a South African citizen. I’ve changed his code a little bit by adding extra functionality to get the person’s age.
The Basics
First, let’s create the classes we require, the first is the IdentityInfo class, that is used to validate the ID Number.
IdentityInfo.cs
public class IdentityInfo
    {
        public IdentityInfo(string identityNumber)
        {
            this.Initialize(identityNumber);
        }

        public string IdentityNumber { get; private set; }

         public DateTime BirthDate { get; private set; }

         public String Gender { get; private set; }

         public int Age { get; private set; }

         public string AgeToLongString { get; private set; }

         public bool IsSouthAfrican { get; private set; }

         public bool IsValid { get; private set; }

         private void Initialize(string identityNumber)
         {
             this.IdentityNumber = (identityNumber ?? string.Empty).Replace(" ", "");
             if (this.IdentityNumber.Length == 13)
             {
                 var digits = new int[13];
                 for (int i = 0; i < 13; i++)
                 {
                     digits[i] = int.Parse(this.IdentityNumber.Substring(i, 1));
                 }
                 int control1 = digits.Where((v, i) => i%2 == 0 && i < 12).Sum();
                 string second = string.Empty;
                 digits.Where((v, i) => i%2 != 0 && i < 12).ToList().ForEach(v =>
                     second += v.ToString());
                 var string2 = (int.Parse(second)*2).ToString();
                 int control2 = 0;
                 for (int i = 0; i < string2.Length; i++)
                 {
                     control2 += int.Parse(string2.Substring(i, 1));
                 }
                 var control = (10 – ((control1 + control2)%10))%10;
                 if (digits[12] == control)
                 {
                     this.BirthDate = DateTime.ParseExact(this.IdentityNumber
                         .Substring(0, 6), "yyMMdd", null);
                     this.Gender = digits[6] < 5 ? "Female" : "Male";
                     this.IsSouthAfrican = digits[10] == 0;
                     this.Age = CalculateAge(BirthDate);
                     this.AgeToLongString = CalculateAgeToLongString(BirthDate);
                     this.IsValid = true;
                 }
             }
         }

         private int CalculateAge(DateTime birthDay)
         {
             DateTime today = DateTime.Today;
             int age = today.Year – birthDay.Year;
             if (birthDay > today.AddYears(-age)) age–;

             return age;
         }

         private string CalculateAgeToLongString(DateTime birthDay)
         {
             TimeSpan difference = DateTime.Now.Subtract(birthDay);
             DateTime currentAge = DateTime.MinValue + difference;
             int years = currentAge.Year – 1;
             int months = currentAge.Month – 1;
             int days = currentAge.Day – 1;

             return String.Format("{0} years, {1} months and {2} days.", years, months, days);
         }
     }
Add a new class to your project, and make sure it derives from ValidationAttribute class. We only need to override two methods for this to work.
RSAIDNumberAttribute.cs
public class RSAIDNumber : ValidationAttribute, IClientValidatable
   {
       public RSAIDNumber()
           : base("{0} is not a valid South African ID Number")
       {

       }

       public override string FormatErrorMessage(string name)
        {
            return String.Format(ErrorMessageString, name);
        }

        protected override ValidationResult IsValid(object value, ValidationContext validationContext)
        {
            IdentityInfo idInfo = new IdentityInfo(value.ToString());

            if (!idInfo.IsValid)
                return new ValidationResult(FormatErrorMessage(validationContext.DisplayName));

            return null;
        }

        public IEnumerable<ModelClientValidationRule> GetClientValidationRules(ModelMetadata metadata,
            ControllerContext context)
        {
            ModelClientValidationRule rule = new ModelClientValidationRule();
            rule.ErrorMessage = FormatErrorMessage(metadata.GetDisplayName());
            rule.ValidationType = "rsaid";
            yield return rule;
        }
    }
You’ll notice that we create a new instance of the IdentityInfo class and pass it the ID Number value. We then use the IsValid property to check if the user did indeed enter a valid South African ID Number.
Next, we need to create a model to validate. Decorate the RSAIDNumber field with the RSAIDNumber custom validation attribute we’ve created earlier:
ApplyModel.cs
public class ApplyModel
{
    [RSAIDNumber(ErrorMessage = "A valid RSA ID Number is required.")]
    public string RSAIDNumber { get; set; }
    public string FirstName { get; set; }
    public string LastName { get; set; }
}
Client-side validation
At this point we have enough for the model to be able to validate the ID Number when the user submits the form i.e server side validation. But it would be much better if we could use client validation, so when the user enters a wrong ID in the field they immediately get a message informing them that the ID number is not valid – eliminating the need to submit the form first.
In order to use client-side validation make sure you set the ClientValidationEnabled and UnobtrusiveJavaScriptEnabled keys in the web.config file to true. These values should be true by default when creating a new MVC project.
<appSettings>
  <add key="ClientValidationEnabled" value="true" />
  <add key="UnobtrusiveJavaScriptEnabled" value="true" />
</appSettings>
Step 1 – Enabling client validation on the validation attribute class
Before we can enable client-side validation for our custom validation attribute, we need to change it to implement the IClientValidatable interface.
public class RSAIDNumber : ValidationAttribute, IClientValidatable
We then need to implement the GetClientValidationRules method. In this method we’ll create a new instance of a ModelClientValidationRule object and set its ErrorMessage as well as the ValidationType properties. The ValidationType property is important for later, when we build our own jQuery validation method.
public IEnumerable<ModelClientValidationRule> GetClientValidationRules(ModelMetadata metadata,
    ControllerContext context)
{
    ModelClientValidationRule rule = new ModelClientValidationRule();
    rule.ErrorMessage = FormatErrorMessage(metadata.GetDisplayName());
    rule.ValidationType = "rsaid";
    yield return rule;
}
Step 2 – Create the jQuery validation method and adapter
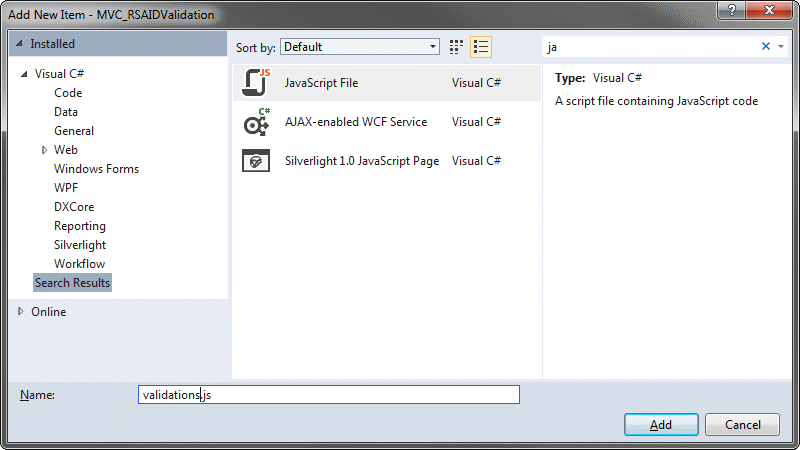
Next, add a new JavaScript file to your project, and call it validations.js.
We’re using MVC 4 so, we need to add our validations.js file to our jqueryval bundle in the BundleConfig.cs class – It’s in the App_Start folder.
bundles.Add(new ScriptBundle("~/bundles/jqueryval").Include(
            "~/Scripts/jquery.unobtrusive*",
            "~/Scripts/jquery.validate*",
            "~/Scripts/validations.js"));
Add the following to your validations.js file:
validations.js
// Validation Method
$.validator.addMethod("rsaid", function (value, element, param) {
    var idnumber = value;

    //1. numeric and 13 digits
    if (isNaN(idnumber) || (idnumber.length != 13)) {
        return false;
    }
     //2. first 6 numbers is a valid date
     var tempDate = new Date(idnumber.substring(0, 2), idnumber.substring(2, 4) – 1, idnumber.substring(4, 6));
     if (!((tempDate.getYear() == idnumber.substring(0, 2)) &&
         (tempDate.getMonth() == idnumber.substring(2, 4) – 1) &&
         (tempDate.getDate() == idnumber.substring(4, 6)))) {
         return false;
     }

     //3. luhn formula
     var tempTotal = 0; var checkSum = 0; var multiplier = 1;
     for (var i = 0; i < 13; ++i) {
         tempTotal = parseInt(idnumber.charAt(i)) * multiplier;
         if (tempTotal > 9) {
             tempTotal = parseInt(tempTotal.toString().charAt(0)) + parseInt(tempTotal.toString().charAt(1));
         }
         checkSum = checkSum + tempTotal;
         multiplier = (multiplier % 2 == 0) ? 1 : 2;
     }
     if ((checkSum % 10) == 0) {
         return true
     };
     return false;
 });

 // Validation Adapter
 jQuery.validator.unobtrusive.adapters.addBool('rsaid');
In case you’re wondering; Yes, you’ll need to add the same type of logic you’ve used in C# to determine whether the ID is valid but in this case using JavaScript. I found the above JavaScript to validate a RSA ID on David Russell’s Blog
The validation adaptor is very easy in this example because we only need to know whether the validation result is True or False, so we register the validation method using the addBool method.
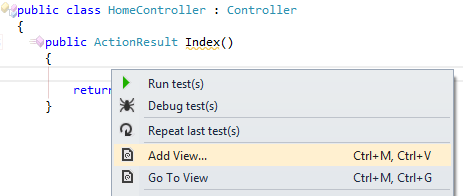
Adding the View
All that is left to do is add a view.
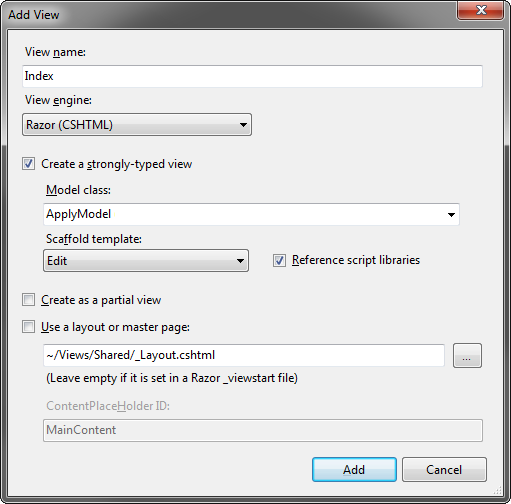
Check the Create a strongly-typed view checkbox and select the model in the combo box( Make sure you’ve compiled your project first!), also check the Reference script libraries checkbox – this will automatically include the jqueryval bundle in the view. Select Edit as the Scaffold template.
The code for your view should look like:
Index.cshtml
@model MVC_RSAIDValidation.Models.ApplyModel

@{
    ViewBag.Title = "Index";
    Layout = "~/Views/Shared/_Layout.cshtml";
}

<h2>Index</h2>

 @using (Html.BeginForm()) {
     @Html.ValidationSummary(false)

     <fieldset>
         <legend>ApplyModel</legend>

         <div class="editor-label">
             @Html.LabelFor(model => model.RSAIDNumber)
         </div>
         <div class="editor-field">
             @Html.EditorFor(model => model.RSAIDNumber)
             @Html.ValidationMessageFor(model => model.RSAIDNumber)
         </div>

         <div class="editor-label">
             @Html.LabelFor(model => model.FirstName)
         </div>
         <div class="editor-field">
             @Html.EditorFor(model => model.FirstName)
             @Html.ValidationMessageFor(model => model.FirstName)
         </div>

         <div class="editor-label">
             @Html.LabelFor(model => model.LastName)
         </div>
         <div class="editor-field">
             @Html.EditorFor(model => model.LastName)
             @Html.ValidationMessageFor(model => model.LastName)
         </div>

         <p>
             <input type="submit" value="Save" />
         </p>
     </fieldset>
 }

 <div>
     @Html.ActionLink("Back to List", "Index")
 </div>

 @section Scripts {
 @Scripts.Render("~/bundles/jqueryval")
  }
Notice the Scripts section in which the jqueryval bundle is rendered – Remember this bundle contains our validation.js file!
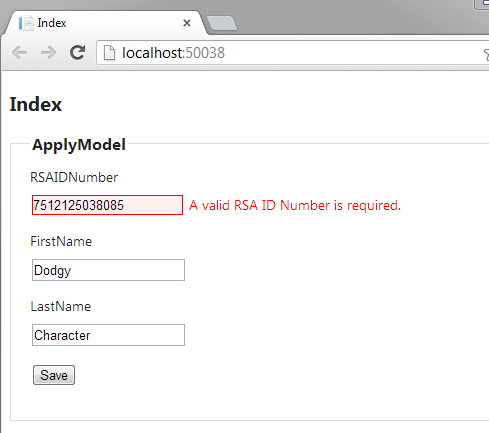
And if everything builds and runs, your page should look like this when the user types an incorrect South African ID Number:
Thank you for reading! I hope you can find this example useful for your own projects!
PS: I’ve used ASP.Net MVC 4 for this example, but it should work equally well in MVC 3, only difference is you’ll need to add the scripts manually as bundling is not available out of the box in MVC 3!