# Using AWS Cognito with Vue/NuxtJS
In my last post, ["Using AWS Cognito with Xamarin Forms"](https://dev.to/pietervdw/using-aws-cognito-with-xamarin-forms-46l5), I showed how to authenticate with Amazon Cognito using Xamarin Forms and the [Xamarin.Essentials Web Authenticator](https://docs.microsoft.com/en-us/xamarin/essentials/web-authenticator).
In this post, we'll go through the process of using the AWS Cognito Hosted UI with your own Vue/NuxtJS site. For an idea on the final result, please take a look at the [YouTube Video](https://www.youtube.com/watch?v=SiqARdvdpdk)
# Setting up an AWS Cognito user pool
We'll be using the same AWS Cognito User pool and App client that we've created in my previous post. Please refer to the instructions details therein.
# Creating the Vue/Nuxt project
To create the Nuxt project, open up your preferred terminal window and enter the following command:
```console
yarn create nuxt-app mynuxtapp
```
When prompted, you can select the following options:
1. Project name: **mynuxtapp**
2. Programming language: **JavaScript**
3. Package manager: **Yarn**
4. UI framework: **Vuetify.js**
5. Nuxt.js modules: **Axios**
6. Rendering mode: **Single Page App**
7. Deployment target: **Static (Static/Jamstack hosting)**
> I've assumed you've already installed everything necessary to create Vue/Nuxt projects. If not, please refer to the [NuxtJS documentation](https://nuxtjs.org/docs/2.x/get-started/installation)
## Adding the nuxt/auth dependency
Add the nuxt/auth dependency to you project by executing the following command:
```console
yarn add --exact @nuxtjs/auth-next
```
Next, in the **nuxt.config.js** file, add the nuxt/auth module to the **modules** array.
```json
modules: [
"@nuxtjs/axios",
"@nuxtjs/auth-next"
],
```
While we have the **nuxt.config.js** file open, also add the **auth** section as below:
```json
auth: {
strategies: {
awsCognito: {
scheme: "oauth2",
endpoints: {
authorization: "https://myxamarinapp.auth.us-east-1.amazoncognito.com/login",
token: "https://myxamarinapp.auth.us-east-1.amazoncognito.com/oauth2/token",
userInfo: "https://myxamarinapp.auth.us-east-1.amazoncognito.com/oauth2/userInfo",
logout: "https://myxamarinapp.auth.us-east-1.amazoncognito.com/logout"
},
token: {
property: "access_token",
type: "Bearer",
maxAge: 3600
},
refreshToken: {
property: "refresh_token",
maxAge: 60 * 60 * 24 * 30
},
responseType: "token",
redirectUri: "http://localhost:3000/login",
logoutRedirectUri: "http://localhost:3000/login",
clientId: "4jlfe2iki0ucn32uc44clmib3d",
scope: ["email", "openid", "profile"],
codeChallengeMethod: "S256"
}
}
}
```
We're using the built-in OAuth2 scheme and we're calling it **awsCognito**. The endpoints are:
**authorization**
This is the domain/url we've configured in AWS Cognito with _/login_ appended. This loads the login page.
**token**
This is the domain/url we've configured in AWS Cognito with _/oauth2/token_ appended. This endpoint is used to get the user's tokens.
**userInfo**
This is the domain/url we've configured in AWS Cognito with _/oauth2/userInfo_ appended. This endpoint is used to retrieve information about the authenticated user.
**logout**
This is the domain/url we've configured in AWS Cognito with _/logout_ appended. Used to sign the user out.
> For more detail regarding these endpoints, please refer to the [Amazon Cognito user pools Auth API Reference](https://docs.aws.amazon.com/cognito/latest/developerguide/cognito-userpools-server-contract-reference.html)
The rest of the **auth** options should be relatively self-explanatory. For this example the important config entries are:
**response_type**
Set this to _token_ to inform AWS Cognito that we want an access_token back.
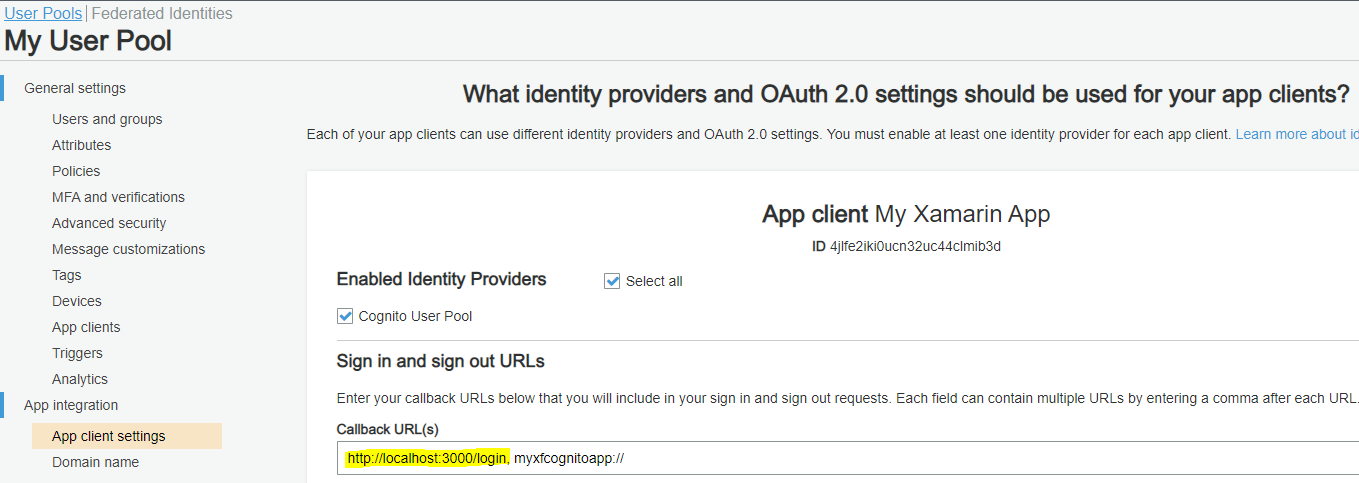
**redirectUri**
This value should also be added to the list of Callback URL(s) under **App integration > App client settings** in AWS Cognito.
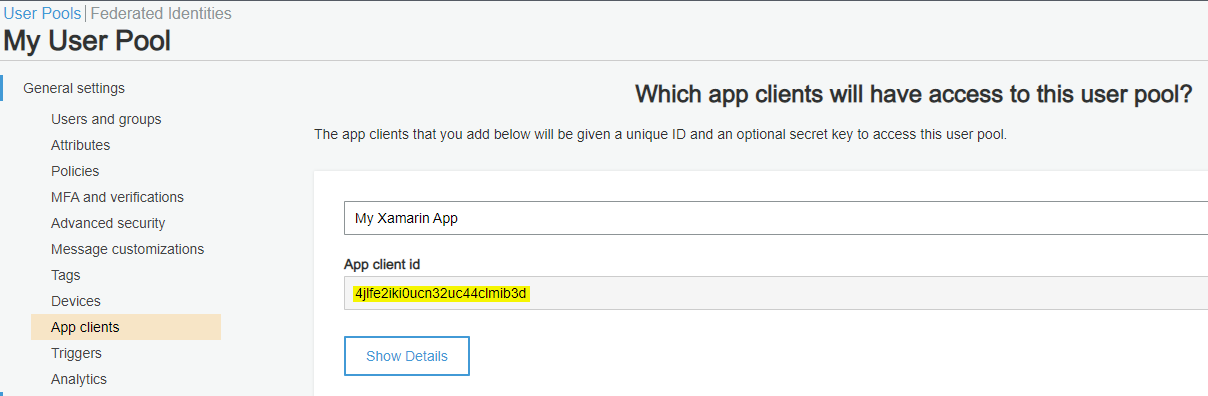
**clientId**
Is the same Client Id as configured in AWS Cognito. You'll find this under **General settings > App clients**
**codeChallengeMethod**
Amazon Cognito authentication server only support S256. This value must be supplied for the nuxt/auth OAuth scheme to work or else you'll receive a "unsupported code challenge method" error.
The last change we need to make in the **nuxt.config.js** file is to enable the auth middleware globally. Do this by setting the router middleware, as show below:
```json
router: {
middleware: ["auth"]
}
```
## UI Changes
***Login Page***
We'll add a simple **login page**, inside the **pages** folder, called login.vue. The page will prompt the user to log in if they are not authenticated. I contains a simple _login_ method that logs in using the **awsCognito** scheme we've configured in the previous step, the code for the method follows:
```javascript
methods: {
login() {
this.$auth.loginWith("awsCognito");
}
}
```
The full code listing for the login page are:
```vue
Logging in.Logging in, please wait...
You're not logged inClick the button to log into your account. Login
```
In the page template we use **v-if** and **v-else** directives to either show a login button or a message informing the user that they are being logged in. This is useful when AWS Cognito redirects to the login page after the user has logged in.
***Home Page***
The home page is located in the pages/index.vue file. This file should've been automatically added for you when you've created the project. This page will only be shown once the user is authenticated and will display some of the user's information as illustrated in the following image:
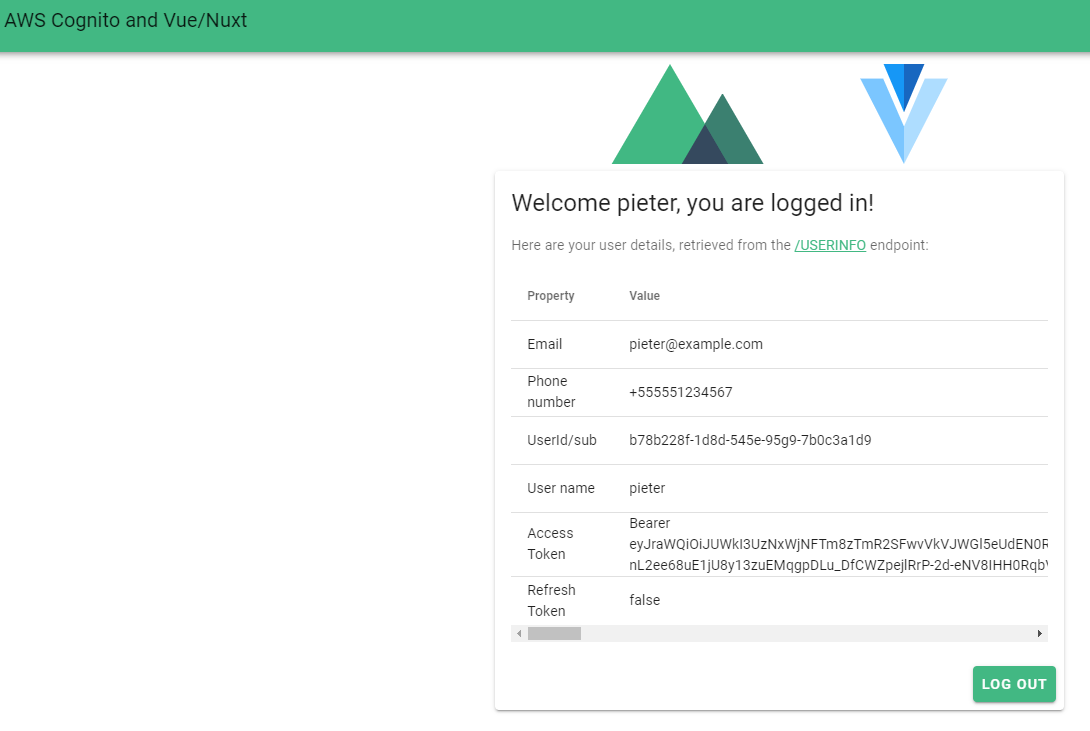
There is not much logic in the page. The most important aspects is that we show the user information using properties on the **this.$auth.user** object and the logOut method uses **this.$auth.logout()** to log the user out when the "Log Out" button is clicked.
The full code listing for the page follows:
```vue
Welcome {{ username }}, you are logged in!
Here are your user details, retrieved from the
/USERINFO
endpoint:
Property
Value
Email
{{ email }}
Phone number
{{ phoneNumber }}
UserId/sub
{{ userId }}
User name
{{ username }}
Access Token
{{ accessToken }}
Refresh Token
{{ refreshToken }}
Log Out
```
> **Note:** I've explicitly shown on the page that the Refresh Token's value is false. This is because that AWS Cognito only returns refresh tokens if the **Authorization Code** grant is used. You can read more about refresh token in the [Amazon Developer docs](https://developer.amazon.com/docs/login-with-amazon/refresh-token.html).
If everything goes according to plan, you should see a program flow similar to the video at the top of this post. I hope this post has been informative and that it can help you get started with Vue/Nuxt and Amazon Cognito.
Thank you for reading. Until next time, keep coding!
Full source code is available on GitHub: [https://github.com/Pietervdw/vuenuxt-awscognito](https://github.com/Pietervdw/vuenuxt-awscognito)